RAPPAHANNOCK COMMUNITY COLLEGE STEM CAMP
  • Home
  • Health-STEM Coding Camp
    • PreAcademy prep
    • Day 1: Basics and Lights >
      • Multicolor LED
      • Button Control
    • Day 2: Ultrasound >
      • Ultrasound Health Lesson
      • Supplement Melody
      • Supplement: Servo >
        • Potentiometer and Motors
        • 2 servo control
    • Day 3: Measuring Pulse >
      • How the body absorbs light
      • OLED Screen Basics >
        • Scrolling Screen Graph
    • Day 4 Making an ECG/EKG! >
      • ECG Health Lesson
      • Pictures to OLED
      • BPM on OLED
    • Day 5: Finishing up/Show >
      • CO2 Sensor
      • IR Light Proximity Sensor
  • 3D Design Camp
    • Prep
    • Day 1: 2D design
    • Day 2: 3D design basics
    • Day 3: Constraints
    • Day 4: Designing a Rocket
    • Day 5: Finishing, launching rockets
  • The Teachers
  • Archive
    • Pictures from prior years
    • 2021 STEM Camp (HS) >
      • The Teachers (2021)
      • PreAcademy prep
      • Day 1: Basics, Lights, and Temperature Sensor >
        • Day 1 Supplement: Measure Temperature
        • Day 1 Supplement: IR Temp Sensor
        • Day 1 Supplement: Identifying Resistors
        • Supplement: Controlling Buttons
        • Supplement: Controlling A Servo
      • Day 2: Measuring Pulse >
        • How the body absorbs light
        • Day 2 Supplement: IR Light Proximity Sensor
        • Day 2 Supplement: Motion Sensor
        • Code to start later on plotter
      • Day 3 Supplement: OLED Screen Basics >
        • Display Screen Temperature
        • IR Temp Sensor And Screen
        • Scrolling Screen Graph
      • Day 4: Finishing up/Show >
        • Pictures to OLED
        • BPM Pulse Sensor
        • Multimeter
    • 2021 STEM Camp (MS) >
      • Home (2021)
      • PreAcademy prep
      • Day 1: Basics, Lights, and Temperature Sensor >
        • Day 1 Supplement: Identifying Resistors
        • Day 1 Supplement: Measure Temperature
        • Day 1 Supplement: IR Light Proximity Sensor
      • Day 2: Ultrasound >
        • Day 2 Supplement: IR Temp Sensor
        • Day 2 Supplement: Controlling A Servo
      • Day 3: Measuring Pulse >
        • Day 3 Supplement: Motion Sensor
      • Day 4: OLED Screen Basics >
        • Temperature Screen Display
        • IR Temp Sensor And Screen
      • Day 5 Friday: Finishing up/Show
    • 2020 STEM Camp >
      • Home (2020)
      • The 2020 Teachers
      • PreAcademy prep
      • Day 1 Monday: Basics and Lights >
        • Day 1 Supplement Activity
      • Day 2 Tuesday: Servos >
        • Day 2 (Suppliment Activities)
      • Day 3 Wednesday: Making an ECG/EKG! >
        • Day 3 (Supplement Page)
      • Day 4 Thursday: Controlling Servos with EMG >
        • Day 4 Supplemental Activity
      • Day 5 Friday: Finishing up/Show >
        • Unused lessons/content
    • 2018 Lessons >
      • Day 1: Basic Coding
      • Day 2: Motors
      • Day 3: Build Robot Claw
      • Day 4: Saving Positions
      • Day 5: Presentations
    • 2017 Camp >
      • Day 1 (Monday)
      • Day 2: Multicolor LED and Keypad
      • Day 3: Servo and Keypad
      • Day 4: Multiple Motors/Stepper Motor
      • Day 5: Presentations
    • Pictures archive for lessons (some graphic images)
  • Contact Us!

Proximity Sensor


IR obstacle sensor - is something in front of me? 

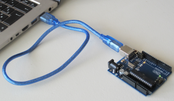
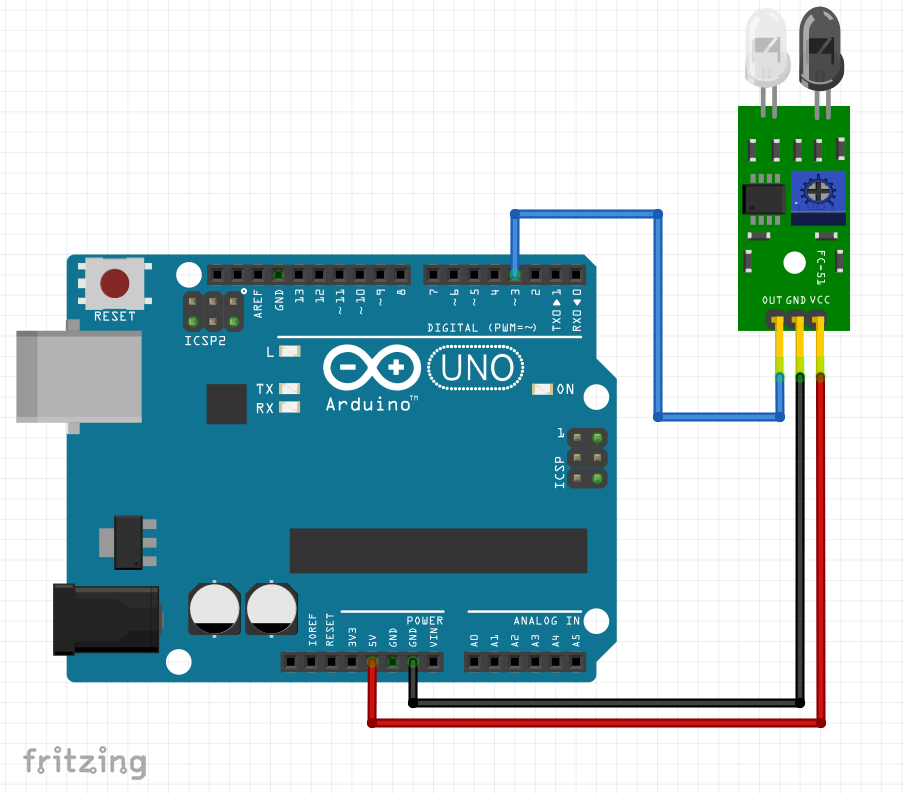
This sensor's only job is to tell if something is in front of it or not. It is easy to wire to the Arduino. See the picture to the right to see how to wire it. 
Picture
Picture
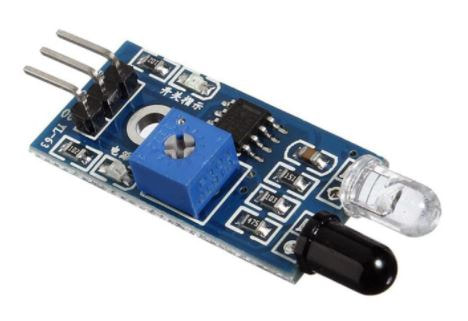
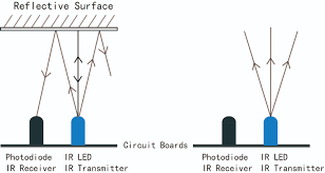
The clear LED is an IR lightbulb. The dark bulb is an IR phototransistor. Photoresistors are devices that amplify current more when more light shines on it. The sensor works by emitting light in front of it and then the detector measures the amount of light reflection. The little screw on the board is a variable resistor that you can use to set the detection threshold. If the detector receives enough light, it outputs that something is there! 
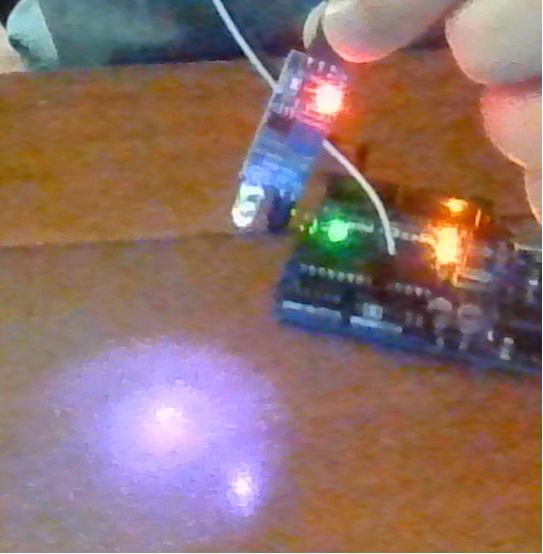
Plug the sensor into the Arduino. Then point a digital camera, like your cell phone or webcam, at it and see if you can see the light using the camera. Note, only some cameras can see IR. 
The bulb not emitting visible light. It is only emitting a specific wavelength of infrared light (IR)! That means it is not visible to your eye.
Picture

Look at this picture and video for how this sensor works. 
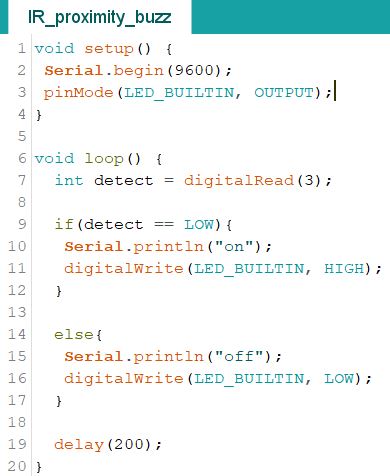
Picture

The code!

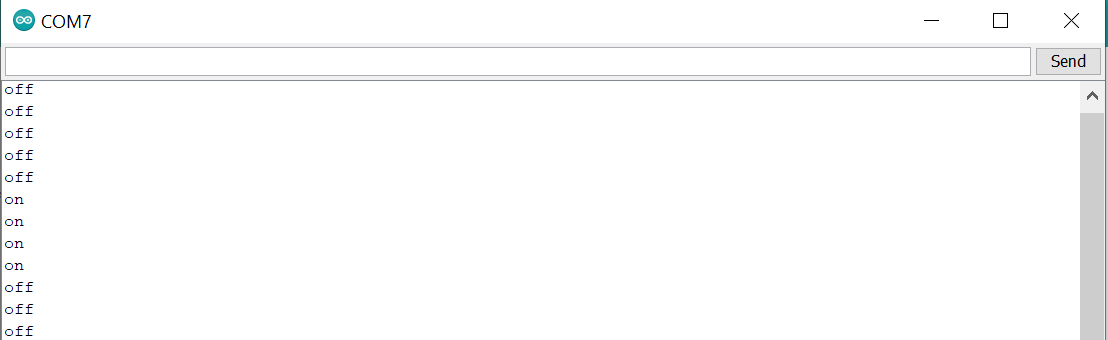
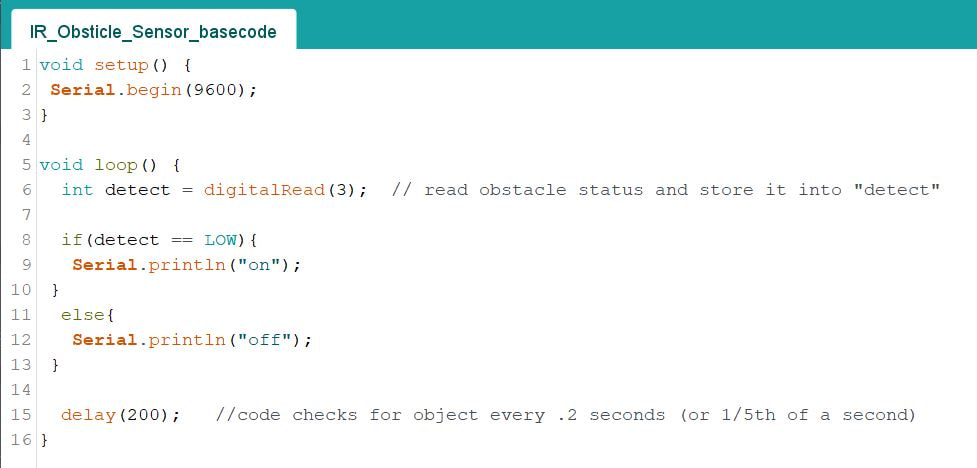
This sensor gives outputs of either 0 or 1 for if something is close to it or not. This code below will print on or off to the Serial Plotter depending on if something is close to it or not. Type out the code below in Arduino IDE
Picture

Upload the code and open the serial monitor and see if it works! 
Picture

Turn on a light when close. 

We can add to the code in order to have a light turn on when the proximity sensor says something is close. Put a LED's + side with a resistor on pin 13 and put the other side in ground. Add these lines to the code to tell the board that you are going to use the LED_BUILTIN (13) as an output and then write on or off when the sensor goes off or on. 
Picture

Test it, Does it work? 

Proudly powered by Weebly
  • Home
  • Health-STEM Coding Camp
    • PreAcademy prep
    • Day 1: Basics and Lights >
      • Multicolor LED
      • Button Control
    • Day 2: Ultrasound >
      • Ultrasound Health Lesson
      • Supplement Melody
      • Supplement: Servo >
        • Potentiometer and Motors
        • 2 servo control
    • Day 3: Measuring Pulse >
      • How the body absorbs light
      • OLED Screen Basics >
        • Scrolling Screen Graph
    • Day 4 Making an ECG/EKG! >
      • ECG Health Lesson
      • Pictures to OLED
      • BPM on OLED
    • Day 5: Finishing up/Show >
      • CO2 Sensor
      • IR Light Proximity Sensor
  • 3D Design Camp
    • Prep
    • Day 1: 2D design
    • Day 2: 3D design basics
    • Day 3: Constraints
    • Day 4: Designing a Rocket
    • Day 5: Finishing, launching rockets
  • The Teachers
  • Archive
    • Pictures from prior years
    • 2021 STEM Camp (HS) >
      • The Teachers (2021)
      • PreAcademy prep
      • Day 1: Basics, Lights, and Temperature Sensor >
        • Day 1 Supplement: Measure Temperature
        • Day 1 Supplement: IR Temp Sensor
        • Day 1 Supplement: Identifying Resistors
        • Supplement: Controlling Buttons
        • Supplement: Controlling A Servo
      • Day 2: Measuring Pulse >
        • How the body absorbs light
        • Day 2 Supplement: IR Light Proximity Sensor
        • Day 2 Supplement: Motion Sensor
        • Code to start later on plotter
      • Day 3 Supplement: OLED Screen Basics >
        • Display Screen Temperature
        • IR Temp Sensor And Screen
        • Scrolling Screen Graph
      • Day 4: Finishing up/Show >
        • Pictures to OLED
        • BPM Pulse Sensor
        • Multimeter
    • 2021 STEM Camp (MS) >
      • Home (2021)
      • PreAcademy prep
      • Day 1: Basics, Lights, and Temperature Sensor >
        • Day 1 Supplement: Identifying Resistors
        • Day 1 Supplement: Measure Temperature
        • Day 1 Supplement: IR Light Proximity Sensor
      • Day 2: Ultrasound >
        • Day 2 Supplement: IR Temp Sensor
        • Day 2 Supplement: Controlling A Servo
      • Day 3: Measuring Pulse >
        • Day 3 Supplement: Motion Sensor
      • Day 4: OLED Screen Basics >
        • Temperature Screen Display
        • IR Temp Sensor And Screen
      • Day 5 Friday: Finishing up/Show
    • 2020 STEM Camp >
      • Home (2020)
      • The 2020 Teachers
      • PreAcademy prep
      • Day 1 Monday: Basics and Lights >
        • Day 1 Supplement Activity
      • Day 2 Tuesday: Servos >
        • Day 2 (Suppliment Activities)
      • Day 3 Wednesday: Making an ECG/EKG! >
        • Day 3 (Supplement Page)
      • Day 4 Thursday: Controlling Servos with EMG >
        • Day 4 Supplemental Activity
      • Day 5 Friday: Finishing up/Show >
        • Unused lessons/content
    • 2018 Lessons >
      • Day 1: Basic Coding
      • Day 2: Motors
      • Day 3: Build Robot Claw
      • Day 4: Saving Positions
      • Day 5: Presentations
    • 2017 Camp >
      • Day 1 (Monday)
      • Day 2: Multicolor LED and Keypad
      • Day 3: Servo and Keypad
      • Day 4: Multiple Motors/Stepper Motor
      • Day 5: Presentations
    • Pictures archive for lessons (some graphic images)
  • Contact Us!