RAPPAHANNOCK COMMUNITY COLLEGE STEM CAMP
  • Home
  • Health-STEM Coding Camp
    • PreAcademy prep
    • Day 1: Basics and Lights >
      • Multicolor LED
      • Button Control
    • Day 2: Ultrasound >
      • Ultrasound Health Lesson
      • Supplement Melody
      • Supplement: Servo >
        • Potentiometer and Motors
        • 2 servo control
    • Day 3: Measuring Pulse >
      • How the body absorbs light
      • OLED Screen Basics >
        • Scrolling Screen Graph
    • Day 4 Making an ECG/EKG! >
      • ECG Health Lesson
      • Pictures to OLED
      • BPM on OLED
    • Day 5: Finishing up/Show >
      • CO2 Sensor
      • IR Light Proximity Sensor
  • 3D Design Camp
    • Prep
    • Day 1: 2D design
    • Day 2: 3D design basics
    • Day 3: Constraints
    • Day 4: Designing a Rocket
    • Day 5: Finishing, launching rockets
  • The Teachers
  • Archive
    • Pictures from prior years
    • 2021 STEM Camp (HS) >
      • The Teachers (2021)
      • PreAcademy prep
      • Day 1: Basics, Lights, and Temperature Sensor >
        • Day 1 Supplement: Measure Temperature
        • Day 1 Supplement: IR Temp Sensor
        • Day 1 Supplement: Identifying Resistors
        • Supplement: Controlling Buttons
        • Supplement: Controlling A Servo
      • Day 2: Measuring Pulse >
        • How the body absorbs light
        • Day 2 Supplement: IR Light Proximity Sensor
        • Day 2 Supplement: Motion Sensor
        • Code to start later on plotter
      • Day 3 Supplement: OLED Screen Basics >
        • Display Screen Temperature
        • IR Temp Sensor And Screen
        • Scrolling Screen Graph
      • Day 4: Finishing up/Show >
        • Pictures to OLED
        • BPM Pulse Sensor
        • Multimeter
    • 2021 STEM Camp (MS) >
      • Home (2021)
      • PreAcademy prep
      • Day 1: Basics, Lights, and Temperature Sensor >
        • Day 1 Supplement: Identifying Resistors
        • Day 1 Supplement: Measure Temperature
        • Day 1 Supplement: IR Light Proximity Sensor
      • Day 2: Ultrasound >
        • Day 2 Supplement: IR Temp Sensor
        • Day 2 Supplement: Controlling A Servo
      • Day 3: Measuring Pulse >
        • Day 3 Supplement: Motion Sensor
      • Day 4: OLED Screen Basics >
        • Temperature Screen Display
        • IR Temp Sensor And Screen
      • Day 5 Friday: Finishing up/Show
    • 2020 STEM Camp >
      • Home (2020)
      • The 2020 Teachers
      • PreAcademy prep
      • Day 1 Monday: Basics and Lights >
        • Day 1 Supplement Activity
      • Day 2 Tuesday: Servos >
        • Day 2 (Suppliment Activities)
      • Day 3 Wednesday: Making an ECG/EKG! >
        • Day 3 (Supplement Page)
      • Day 4 Thursday: Controlling Servos with EMG >
        • Day 4 Supplemental Activity
      • Day 5 Friday: Finishing up/Show >
        • Unused lessons/content
    • 2018 Lessons >
      • Day 1: Basic Coding
      • Day 2: Motors
      • Day 3: Build Robot Claw
      • Day 4: Saving Positions
      • Day 5: Presentations
    • 2017 Camp >
      • Day 1 (Monday)
      • Day 2: Multicolor LED and Keypad
      • Day 3: Servo and Keypad
      • Day 4: Multiple Motors/Stepper Motor
      • Day 5: Presentations
    • Pictures archive for lessons (some graphic images)
  • Contact Us!

Day 4:  July 26, 2023
Building your own ECG!

​Materials needed for today's activity. 
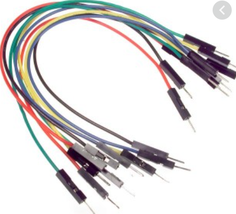
Spare Wires
Picture
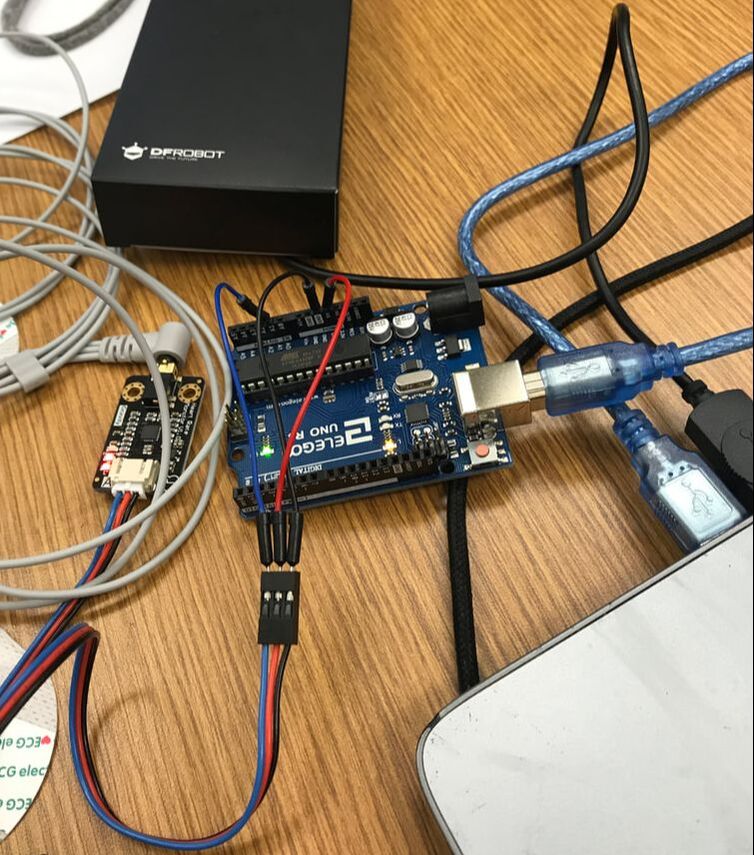
Arduino and USB Cord
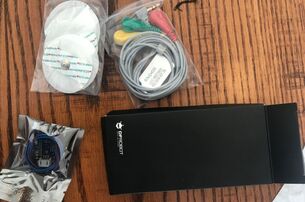
Picture
3 Lead ECG
Picture

Note: Not for diagnostic purposes

The Arduino heart monitor and the IDE Serial Monitor for this lesson are purely for educational purposes and should not be used for any diagnostic purpose.  If  you have any medical concerns that arise as a result of this education experience, contact your health care provider for advice.   

Watch this Video about our ECG


Setting up the Heart Monitor. 

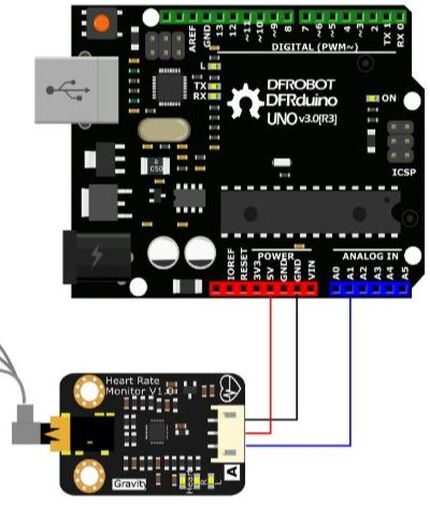
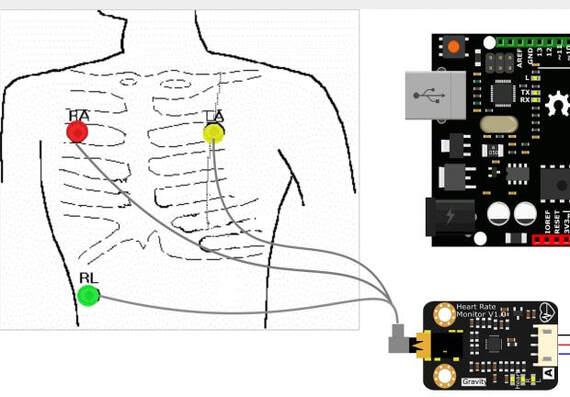
Step 1) The first step will be to hook up the electronics of your heart monitor. Here is a wiring diagram. 
Picture
Picture

The Code

Picture
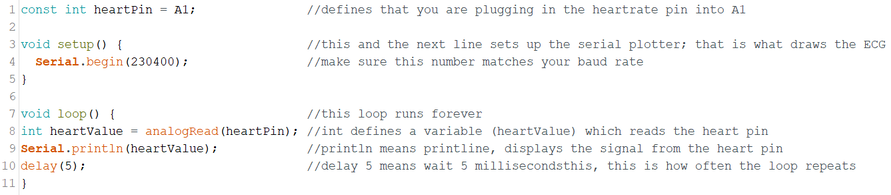
Verify that your code works by pushing the check button in the upper left. 
If you get an error message, try the troubleshooting skills you learned on day one. See this link for a reminder. 
https://www.rcccamp.org/day-1-monday-basics-and-lights.html

Upload your code to the board
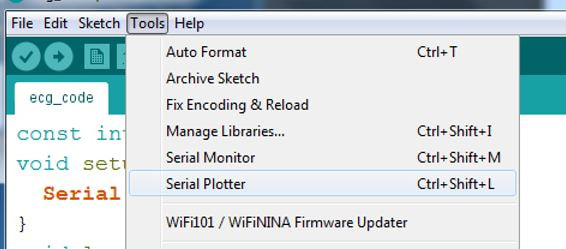
Open up the Serial Plotter by selecting Tools and then Serial Plotter

Your Arduino should now be looking for your body's electrical signal and show a graphing screen. You are ready to hook up. 
Picture
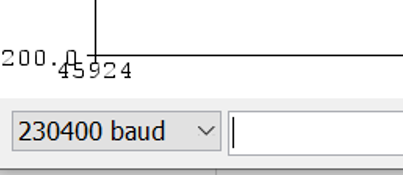
You will have to make sure that the baud rate at the bottom left of the plotter matches the number you put in the Serial.begin line of your code in order for it to work. 

See the pictures at the right. 

Picture
Picture

How to hook up your Heart Monitor?

We'll show you how to place the electrodes. If you are not taking this class in person, watch the videos in the health science lesson for today. 


​Here is a picture to help you see where to place the pads. 
Picture

Seeing your Heart Rhythm! 

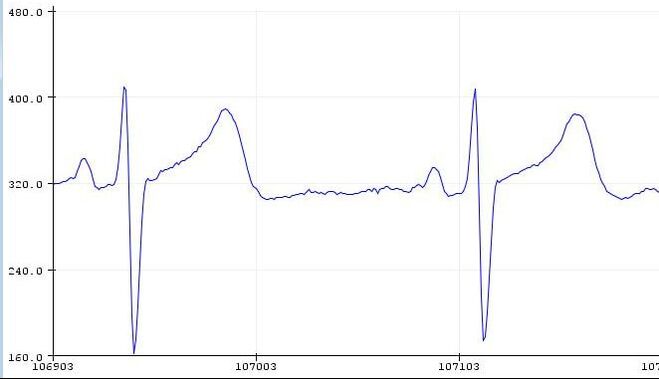
Now that you are all plugged in, you should be able to see your heart rhythm. ​The Arduino Serial Plotter should look something like below, this is Mr. Dorsey's heart. 
Picture
Here is Mr. Dorsey explaining how he got his heart rhythm.
​Tip (stay still!)

Control Electronics with your Heart

We will now learn some things we can do with our heart signals! 
Picture
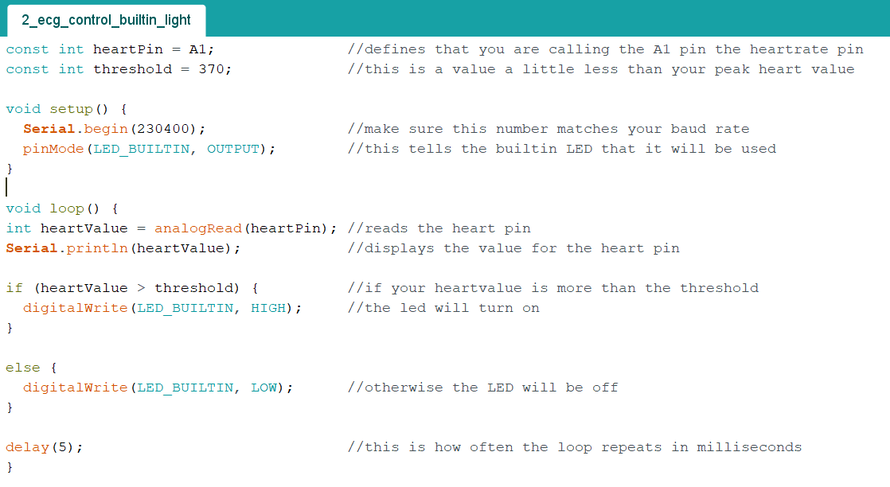
Send your code to your Arduino and open the Serial Plotter. See if your Arduino's builtin LED is lighting up at the same time your heart beats. Below is how to adjust your code to work perfectly for you.

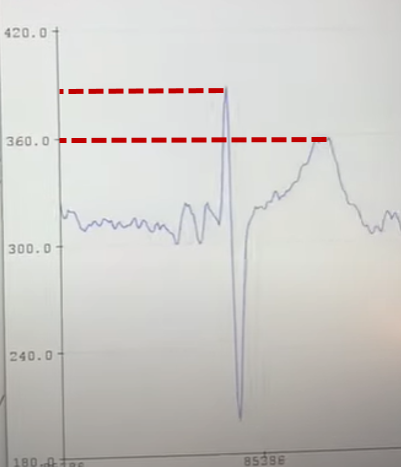
Finding your threshold value

You have always been told that everybody is different. Well, so is everyone's heart! The threshold value I used for my code above will be different  than the one you need. 

See how my highest hump is at about 390 and my 2nd highest hump is at around 360. You have to pick a threshold number between those two. I chose 370. 
Picture
Change your code's threshold number to work with your heart's numbers and resend your code to your board. 
Picture
Remember to save your code!

Does the onboard LED light when your heart beats? 

​Your onboard LED should be blinking once every time your heart beats.

If you need help, watch this video. 

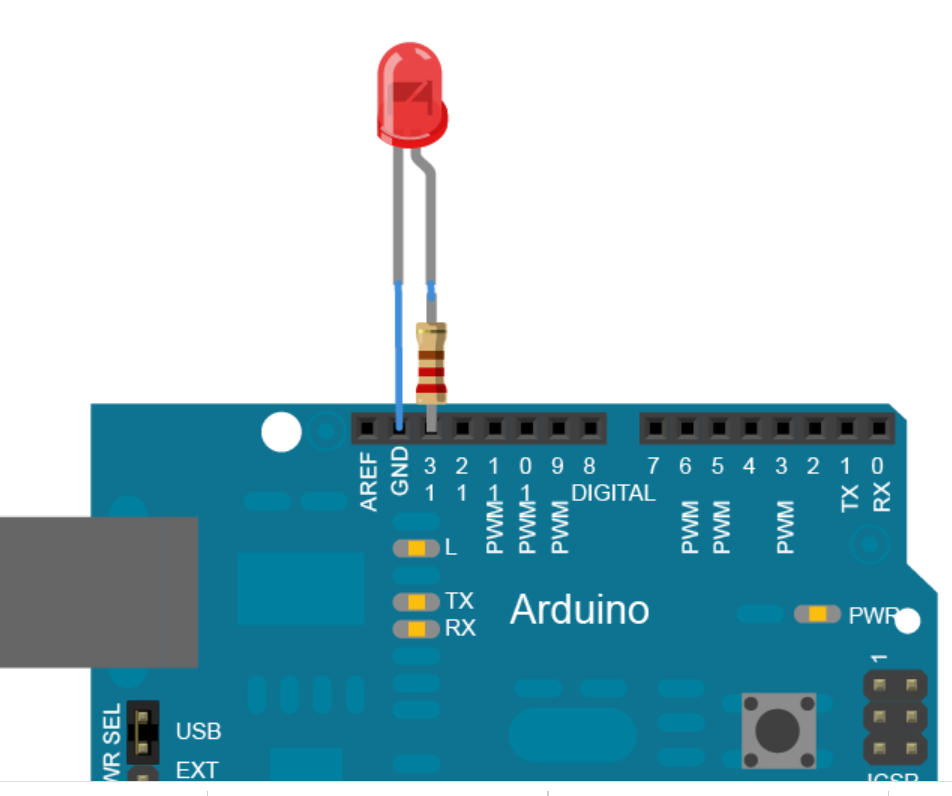
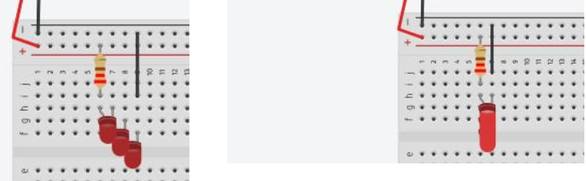
Controlling an off board light with your heart. 

Plug in your resistor attached to your LED like below to control your light using your heart.  That is the 220 Ohm resistor and a red LED.
Picture

Let's make a light show.

Remember the series and parallel lesson using the bread board? You can actually put a bunch of lights on your breadboard that will light up whenever your heart beats! For the +- rail, hook the black wire to the GND and the + red wire to pin 13.  
Picture
After you get your lights to work with your heart, feel free to share a video with your teacher by emailing it to them!

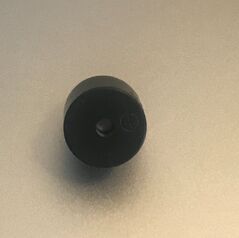
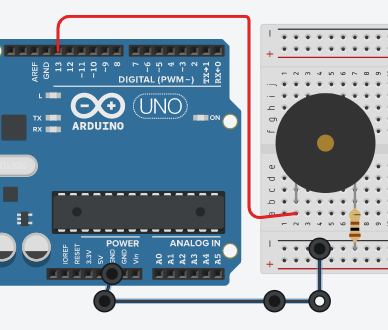
LET'S MAKE SOME NOISE! (Buzzer) 

Once you are able to get lights to work on your bread board, all you have to do is replace the lights with the buzzer in your kit and your buzzer should beep every time your heart beats. 
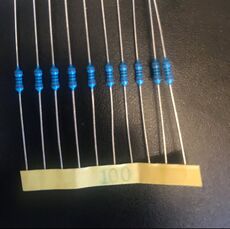
You will need the buzzer and a 100 Ohm resistor for this.

If your buzzer turns out too quiet, you can also try the 10 Ohm resistor.
Picture
Picture
Picture
Here is a video showing it working. ​This uses the same code as before. 

Proudly powered by Weebly
  • Home
  • Health-STEM Coding Camp
    • PreAcademy prep
    • Day 1: Basics and Lights >
      • Multicolor LED
      • Button Control
    • Day 2: Ultrasound >
      • Ultrasound Health Lesson
      • Supplement Melody
      • Supplement: Servo >
        • Potentiometer and Motors
        • 2 servo control
    • Day 3: Measuring Pulse >
      • How the body absorbs light
      • OLED Screen Basics >
        • Scrolling Screen Graph
    • Day 4 Making an ECG/EKG! >
      • ECG Health Lesson
      • Pictures to OLED
      • BPM on OLED
    • Day 5: Finishing up/Show >
      • CO2 Sensor
      • IR Light Proximity Sensor
  • 3D Design Camp
    • Prep
    • Day 1: 2D design
    • Day 2: 3D design basics
    • Day 3: Constraints
    • Day 4: Designing a Rocket
    • Day 5: Finishing, launching rockets
  • The Teachers
  • Archive
    • Pictures from prior years
    • 2021 STEM Camp (HS) >
      • The Teachers (2021)
      • PreAcademy prep
      • Day 1: Basics, Lights, and Temperature Sensor >
        • Day 1 Supplement: Measure Temperature
        • Day 1 Supplement: IR Temp Sensor
        • Day 1 Supplement: Identifying Resistors
        • Supplement: Controlling Buttons
        • Supplement: Controlling A Servo
      • Day 2: Measuring Pulse >
        • How the body absorbs light
        • Day 2 Supplement: IR Light Proximity Sensor
        • Day 2 Supplement: Motion Sensor
        • Code to start later on plotter
      • Day 3 Supplement: OLED Screen Basics >
        • Display Screen Temperature
        • IR Temp Sensor And Screen
        • Scrolling Screen Graph
      • Day 4: Finishing up/Show >
        • Pictures to OLED
        • BPM Pulse Sensor
        • Multimeter
    • 2021 STEM Camp (MS) >
      • Home (2021)
      • PreAcademy prep
      • Day 1: Basics, Lights, and Temperature Sensor >
        • Day 1 Supplement: Identifying Resistors
        • Day 1 Supplement: Measure Temperature
        • Day 1 Supplement: IR Light Proximity Sensor
      • Day 2: Ultrasound >
        • Day 2 Supplement: IR Temp Sensor
        • Day 2 Supplement: Controlling A Servo
      • Day 3: Measuring Pulse >
        • Day 3 Supplement: Motion Sensor
      • Day 4: OLED Screen Basics >
        • Temperature Screen Display
        • IR Temp Sensor And Screen
      • Day 5 Friday: Finishing up/Show
    • 2020 STEM Camp >
      • Home (2020)
      • The 2020 Teachers
      • PreAcademy prep
      • Day 1 Monday: Basics and Lights >
        • Day 1 Supplement Activity
      • Day 2 Tuesday: Servos >
        • Day 2 (Suppliment Activities)
      • Day 3 Wednesday: Making an ECG/EKG! >
        • Day 3 (Supplement Page)
      • Day 4 Thursday: Controlling Servos with EMG >
        • Day 4 Supplemental Activity
      • Day 5 Friday: Finishing up/Show >
        • Unused lessons/content
    • 2018 Lessons >
      • Day 1: Basic Coding
      • Day 2: Motors
      • Day 3: Build Robot Claw
      • Day 4: Saving Positions
      • Day 5: Presentations
    • 2017 Camp >
      • Day 1 (Monday)
      • Day 2: Multicolor LED and Keypad
      • Day 3: Servo and Keypad
      • Day 4: Multiple Motors/Stepper Motor
      • Day 5: Presentations
    • Pictures archive for lessons (some graphic images)
  • Contact Us!