The Regular Motor
The regular motor is simple. Just plug the positive into one of the output arduino pins and the negative into the breadboard. Here is a sample code to get the motor to turn on and off.
#define Motor A5 //defines "Motor" to use this pin to turn on or off (Change A5 to whatever pin you use)
void setup() {
pinMode(Motor,OUTPUT); //Defines the pin for the motor on "A5" to be an output
}
void loop() {
digitalWrite(Motor, HIGH); //this just turns the motor on
delay (400);
digitalWrite(Motor, LOW); //This turns the motor off
delay (400);
}
void setup() {
pinMode(Motor,OUTPUT); //Defines the pin for the motor on "A5" to be an output
}
void loop() {
digitalWrite(Motor, HIGH); //this just turns the motor on
delay (400);
digitalWrite(Motor, LOW); //This turns the motor off
delay (400);
}
Did your motor work? Figure out how you want to use this motor in your device, install it, and play with your code to get it to do what you want. Once you are happy with it, set it up to work with your keypad just like you did to turn LEDs on and off.
That code will look something like this after defining your motor to use a pin and using a bool to set the state as on or off. Move each of these parts in the right place in your keypad code.
#define Motor A5 // defines the "Motor" to use this pin to turn on or off
bool motorState=0; //sets the motor to be off as standard
void setup() {
pinMode(Motor,OUTPUT); //Defines the pin for the motor on "A5" to be an output
}
void loop (){
char customKey = customKeypad.getKey();
if(customKey == '5'){ //This part defines a key to turns the motor on and off
if (motorState==0){ //if the motor is off (set to 0)
digitalWrite(Motor, HIGH); //turns it on
motorState = 1; //sets the bool to on
}
else if (motorState==1){ //if the motor is on (1)
digitalWrite(Motor, LOW); //turns it off
motorState=0; //writes the bool as off so the arduino knows
}
}
}
Now try to connect the motor to working with the keypad
Copy and paste the parts into your working keypad code.
Figure out how your group will use the motor in your animatronic or skit and install it into your design. The keypad code to make this work looks a lot like getting your onboard LED to work.
This code is also exactly the same as how to add off-board LED to work with your arduino for your robot.
Figure out how your group will use the motor in your animatronic or skit and install it into your design. The keypad code to make this work looks a lot like getting your onboard LED to work.
This code is also exactly the same as how to add off-board LED to work with your arduino for your robot.
How to do more than one Servo.
If you want to do more than one servo you are going to need to.
1) Add another servo to your: Servo myservo2; at the top of your code (you need a different name)
2) Add your second servo to your void setup
myservo2.attach(10); // attaches the servo on pin 10
myservo2.write(pos); //Resets the servo to zero degrees
3) Copy your if statements in your keypad code that have your first servo and just change everything that says "myservo" to saying "myservo2" instead
If you want your second servo to go to different positions than your first you may need to declare a different integer than pos and use that instead.
These steps can be done again to add more servos.
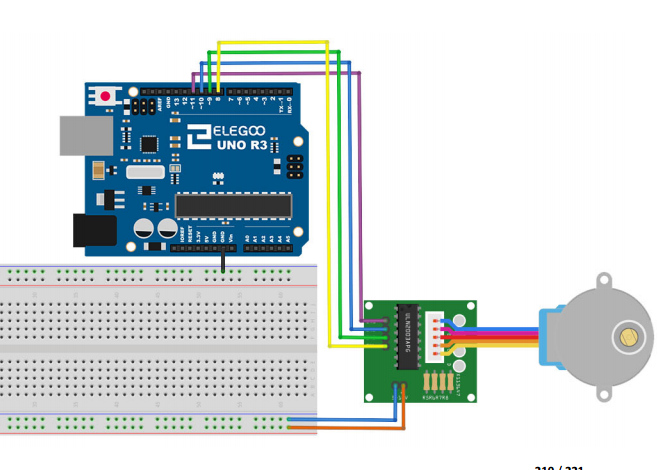
The Stepper Motor (This is an extra lesson if you get to it)
To find the sample stepper motor codes, open your Arduino IDE and go to
1) File
2) Examples
3) Stepper one rev
1) File
2) Examples
3) Stepper one rev
Here is the sample base code
#include <Stepper.h>
const int stepsPerRevolution = 200; // change this to fit the number of steps per revolution for your motor
Stepper myStepper(stepsPerRevolution, 8, 9, 10, 11); // initialize the stepper library on pins 8 through 11:
// (change as needed)
void setup() {
myStepper.setSpeed(60); // set the speed at 60 rpm:
}
void loop() {
myStepper.step(stepsPerRevolution); // step one revolution in one direction:
delay(500);
myStepper.step(-stepsPerRevolution); // step one revolution in the other direction:
delay(500);
}
Try and get your stepper to work with your keypad
Once you get it to work on its own, see if you can figure out how to add the code to your keypad so it goes clockwise and counterclockwise by pushing different buttons. See the complete example code in the google doc if you are having problems.
Figure out how you can incorporate the stepper motor into your animatronics, if you want.
Figure out how you can incorporate the stepper motor into your animatronics, if you want.